Mechanical Mods
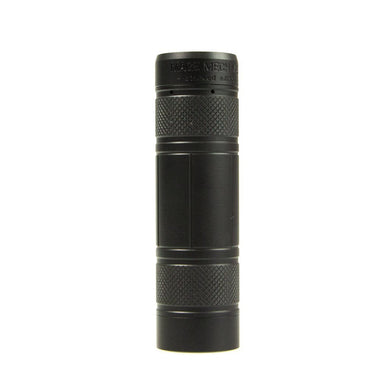
Alright, well hey, everybody GrimmGreen back here today, thank you so much for joining me. I have a vape-y thing that I wanted to talk about today. What we're gonna be talking about is this Mech Mod RDA Combo from VGOD. This is the Pro Mech 2 Kit, comes as a complete kit, 18650 single, 18650 mech mod and a two post Kennedy airflow, RDA on top. It's fun, it's a fun little set up. It looks and feels very tactical and it looks and feels also very solid. Everything about this whole kit is just ve

Video Transcript: VGOD Mech Pro 2 Kit ~ Review ~ Build ~ Clouds by GrimmGreen
Alright, well hey, everybody GrimmGreen back here today, thank you so much for joining me. I have a vape-y thing that I wanted to talk about today. What we're gonna be talking about is this Mech Mod RDA Combo from VGOD. This is the Pro Mech 2 Kit, comes as a complete kit, 18650 single, 18650 mech mod and a two post Kennedy airflow, RDA on top. It's fun, it's a fun little set up. It looks and feels very tactical and it looks and feels also very solid. Everything about this whole kit is just very well done, very solid, very solid feeling. Anyway, in order to get to know this set up just a little bit better, what we're gonna do is go up close as we always do, that's right, quick show it up-y close-y time. Go. And here we go, yee-haw, we're gonna be talk about the VGOD Pro Mech 2 Kit and I purposely did not clean any of this up 'cause I wanted to show you, sometimes juice just appears and happens, it's because this drip tip right here unscrews. This drip tip unscrews right here and sometimes I get some juice condensation that kind of just leaks out of that seam, it just kind of appears randomly, and I really only notice it because this is like that matte black finish, so you kind of see the juice residue, I don't know, a little bit more. You can kind of see, right where that seam is, right there, there's just, I don't know, I get a little bit of juice condensation that kind of comes out here. You clean it up every once in a while but it always seems to come back.
So the mod itself is a cerakoted copper tube and it's got these Delrin sort of sleeves that go one it, just like that and I haven't seen these anywhere else, I don't know if you can buy different ones, maybe different color ones, maybe different pattern ones, I think that would be very cool, but these just kind of sit on here. The bottom one's held in with just the switch. The top one comes off too and I wanna show you real quick before we get there, my favorite design feature of this RDA that comes with this Mech mod, there's these little notches right here, cut out on the top cap, see that notch, see that notch. When you set this on here, it makes it really easy to unscrew your atomizer and I really, really like that. Top sleeve comes off as well, it's held on by an o-ring and then that's just the bare mech mod tube. You can see copper on the inside, hybrid 510 connection right there. It's a pretty unique switch, and I couldn't tell you the science behind having three contacts come up and touch the bottom of your battery. I will say it seems to work really well. This mech mod hits nice and hard, but I don't know if there's any actual, I don't know, data or science or anything that says that three contacts coming up and hitting the button is better than one contact. They say it's to increase surface contact with the battery.
I genuinely don't know if that's true, but I will say they do all move evenly and they all hit the button where they all hit the battery rather evenly and the mech hits nice and hard and there's a little spring loaded Delrin piece here on the bottom to take up for battery rattle. The bottom of the button itself is a very nice textured carbon fiber, it feels very textured, and it feels nice and smooth to press. So I got a battery in the inside, I'm gonna put the switch back on and we're gonna take a look at the deck of the RDA real fast. And both of these sleeves kinda move independently. So if you want them to look uniform, like if you want them to be lined up like that, you kinda have to do it yourself, otherwise they'll spin and I don't know, that doesn't necessarily look dumb or stupid, it's just one of those things. When I see these lines that don't match up, like if it was offset, like this, it kind of makes me go Ahh, so I kind of always have to adjust this back into place and keep all these segments sort of lined up like that.
So, we're gonna pop the top, look at the deck. Yeah, there's the deck right there, big two post deck. It's got Kennedy style airflow, comes in and up at your coils. These are some spaced aliens on here. This is just the build I have in here right now, but what we're gonna do real quick is go further back into up-y close-y inception and I'm gonna show you when I installed this build. Also got a real nice deep juice well in there. Okay, now let's go watch the build. Alright, well we're gonna build this VGOD Mech Pro 2 RDA, you can see it's a two post design and first thing I noticed is that these posts are pretty far apart from each other. We're gonna need to have maybe a really wide coil or maybe like a spaced coil just to span the distance between these two posts. I grab some of these Ohm Science coils that I'm gonna be using, but first things first, there are these sort of thumb screws, speaker wire capture things, but there are also Philips head screws on top and don't worry, you can kinda take these off completely, just don't lose them.
So if I grab one of these coils, you can see... Yeah, it's kind of compact. In fact, it's narrow enough to fit actually in between the posts but we need something to go from post to post rather than between the posts. So I'm gonna do a little trick on these coils that I've been doing lately, we're gonna turn these premade Ohm Science frame staple aliens into spaced coils like this. It makes it really easy when you need to span the distance between a two post atomizer. It's much easier than trying to bend the leads to fit in there and keeping this coil intact, you just spread the whole coil out, makes things much easier. And I can do this because I have finger nails and if you don't have finger nails, you might have an issue, but I grab the first coil and I grab the last coil with my finger nails and I kinda dig them in there a little bit, and then I just pull, you just stretch it out and it's a little bit springy and elastic-y. You stretch this out, and you measure... Yeah, that looks pretty good. Let's stretch it out, I don't know, maybe a little bit more. And you can always correct if you stretch it out a little bit too far, like yeah, that's a little bit too far. I'm just gonna take this whole thing and I kind of hold it in my hand like this, and I'm just gonna compress it down, back down just a little bit.
So now we have a spaced ohm science frame staple alien that will easily span the distance of these two posts. In fact, if I just do a test fit right there. Yeah, right in, right in and I kinda already cheated. I did this twice already with two coils, so I am going to see how these fit in here first. So I'm not sure if this is gonna show up very well on camera, but you can see these post holes aren't very wide across, so we're gonna have to stack our leads like on top of each other, which is no big deal. A lot of atomizers do this and you just have to see it before you build it and then adjust your build accordingly. This isn't like a clamp system where you can just set your big leads next to each other, you kinda have to sandwich them on top of each other with these particular leads. So using my little three millimeter tool I'm just gonna set this coil where, kinda where I want it to be, a little bit close to the post, but enough to be hitting that airflow right there. I'm gonna pre-clip these leads right here. Now, I'm gonna pop the other coil in there, on the same side, and position it where I want it, pre-clip the leads. So that coil's in there, the leads are pre-clipped and I'm just gonna install the other coil and screw down the thumb screws.
Yeah, that's kind of a thing right now. These are gonna take a little bit of pinching, glowing, sort of moving them around with the tool, with the screwdriver, and with my ceramic tweezers.
So yeah, that's pretty much it. With spaced coils it's really very simple to get them glowing evenly. They're not touching each other, so you don't have to worry about any sort of fusing together or hot spots, or anything like that. These are glowing. Oh yeah, real nice, real super evenly. I'm excited about it, I wanna wick this.
Ah, certainly not the most beautiful coils, but they're gonna do their job, so what we're gonna do now is go back to up-y close-y time. Alright, welcome back and while you guys were gone I went ahead and just re-wicked this atomizer and this atomizer is very much a pop and paint atomizer. You can't really bleh your juice through the middle because when you bleh your juice through the middle, it kind of just goes down to the bottom of the deck. After I paint my coils, I do bleh some juice down into that juice well down there, and it will wick up to your coils. But when my vaping it, in my day to day vaping it, I definitely have to pop the top and paint my coil.
So, I'm just gonna juice these up real quick right now. It's not a terribly tedious process. You kind of just pop the top, paint your coils, put a few drops bleh that right down the middle, and you're kinda good to go. As long as your wicks are down, touching the bottom, not necessarily bunched up at the bottom, but touching the bottom, coming into contact with that juice, it will definitely wick up to your coils and you can vape all of the juice that ends up in your juice well. Got these all juiced up, boom, the vapors are happening and then you just take your cap and you put it on like that, or I shouldn't even say AFC. The air flow has no air flow control, it has no AFC, it's not adjustable in any way, and you can kind of already see from the few times that I've popped and painted. Yeah, there's a little bit of juice, a little bit of juice residue kinda happening around the seams, even a little bit around the top already. And again, it's just more noticeable on this because it's that matte black and any little bit of moisture from your liquid or anything, it's gonna show, it's gonna show on this. Yeah, that's all there is to it, up close and personal. What we're gonna do right now is we're gonna get back out to normal view, we're going to vape this guy.
Clouds, clouds, clouds, bro, clouds and flavor. Look, I've been having a really fun time with this. I've been on a mech kick lately, thanks to that amazing Dreamer Mech and I've just been overall using a lot of mech mods and RDAS more recently, and so I was really excited to try out this VGOD Mech Pro 2 kit and it hasn't really let me down in any way. It's not, again, and I say this a lot recently, for some reason, it's not innovative, it's not revolutionary, it's nothing new, they're not trying to reinvent the wheel, but it's a nice mech mod. It is a nice, hefty, copper, cerakoted mech mod with the two little sleeves. You get an RDA with it that has great flavor, Kennedy style air flow, a little bit weird of a deck, I wish those posts weren't so far apart, but they are so you just kind of deal with it, I guess. I know I said this in the up-y close-y portion, but I really do love, whoops, dropping everything... I really do love these tabs on here. There's these big sort of tabs on the top cap, so that when you pop it down on here it fits in these little grooves and then when you wanna unscrew it from your mech, you can just grab the top cap because those little teeth are grabbing your deck and you can unscrew it, much easier, screw it back down much easier. I know a lot of people make fun of the tip of this, some people have said it looks like an uncircumcised you know thing, well, wiener parts. Wiener parts? Yeah, good. I didn't get that vibe from it.
It just is very comfortable. It's very comfortable to put this in your mouth. That's What She Said jokes, just go nuts. But, it does, it feels really comfortable to put this in your mouth. I really like the switch on here and like I said in the up close, I don't know if there's any science or evidence or anything to show that three prongs on a button, coming up and hitting the contact is better or worse than just one. I couldn't really tell you the science behind it. I know that the switch is nice and smooth and because this is a copper tube it's just gonna hit really hard. This is a.14, like I showed you, spaced out aliens and it's been rocking, rocking hard. It's a real cloud chase-y RDA, but thankfully this cloud chase-y RDA, because of that Kennedy style air flow, it delivers some just very special flavor. And apart from the little kind of leaky bits, the little juice compensation that kind of happens up here, if you get carried away and you bleh too much juice in there, there is a pretty strong possibility it can just leak right out your airflow. It's happened to me a couple of times when I got real carried away with juice, but if you keep an eye on it, if you know what you're doing, you can really prevent this from leaking.
But yeah, I'm not sure what else to say about it. I like the carbon fiber on the bottom. I like the button. I mostly like this RDA and I really like this Mech. Now we're gonna talk about vape budget hands. You're gonna need your vape budget hands for something like this. Well, clicking over to the VGOD website, they have it in stock, it's $94.95, so $95. And what you're getting for $95 is a very well-made, very tactical and heavy duty copper, cerakoted, sleeved, Delrin sleeved mech mod and a very serviceable, very well built as well, two post, Kennedy airflow style RDA. It's a great kit and it just doesn't tick all of the boxes for me.
So if we're gonna play the aliens game or the FDA game where they come take everything I have, is the Mech Pro 2 kit something I would seek out and buy? No, probably not. So yeah, it is what it is. I'm not handing out any banana stickers today, I'm not doing this is a very highly recommended thing today, but if you're looking for a mech mod RDA combo that you know is going to be very well-built and be very high quality, the VGOD Pro Series Mech 2 kit could be what you're looking for. But anyway, I'm gonna stop rambling right now, it is what it is, the VGOD Pro Mech 2 Kit, I will throw some links down in the description where you can check it out if you are interested, but that's what I got for today, everybody. Thank you so much for watching and as always, yeah, let's keep on vaping.
This doesn't help me blow better Os...