
Made for heavy-duty vapers, the Vaporesso Revenger Kit is the real deal in every sense of the word – be it the OMNI 2.0 board, its groundbreaking tank with GT core coil system or the exceptional performance. The Vaporesso Revenger Kit has a one-of-its-kind design/form factor, with its convenient and ergonomic, usability. The new flagship kit can fire up to 220W with a minimum resistance of 0.05Ω and is inclusive of a minimum resistance of 0.05Ω. The NRG Mini tank features a slide and fill top cap design for easy filling and a unique mesh drip tip to prevent spit back.

Vaporesso Vaporesso Revenger reviews
Video Transcript: Vaporesso Revenger 220W TC Starter Kit Review by Zophie Vapes
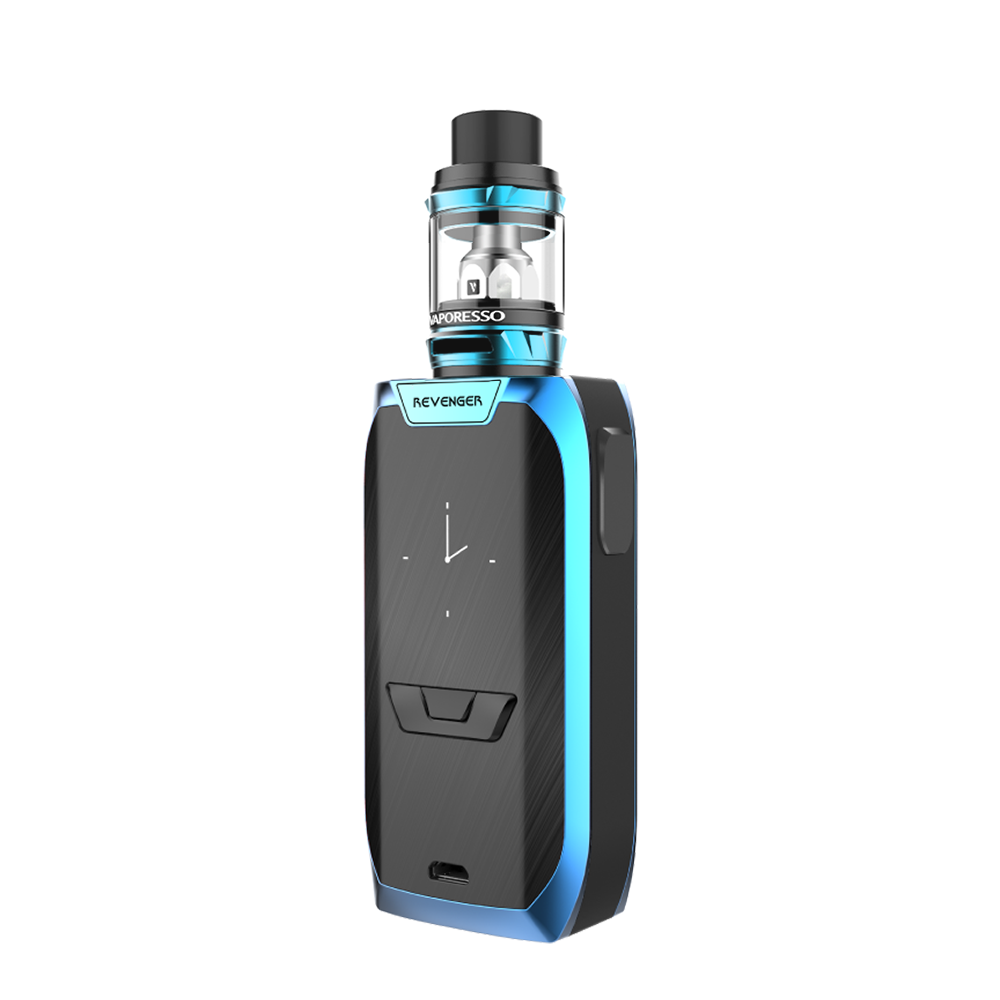
For review today the Revenger, by Vaporesso. I like Vaporesso, they spend a lot of time on their packaging, so I'm assuming they spend even more time on their products. And when Vaporesso comes out with something, it's always really nice and sleek looking, a little bit different from other companies. And it feels nice in my hand, especially when I'm holding it like this, I like the way it rests right here, there's no sharp edges. Sleek, beautiful, mod. And when the screen times out it goes to this clock, however you can turn that off.
It uses an OMNI Board chipset and I absolutely love that chip. Not only does it fire really fast, it's extremely customizable. There's power curves, you can do temperature control, nickel, titanium, stainless steel, there's also bypass mode and memory, where you can set your TCR settings. With that OMNI Board chipset inside of there, it also has smart wattage recognition so when you put an here, it'll set the wattage based on the resistance of the coil. However, if you don't like that you can turn it off. So it's gonna have some pros. It's gonna have some cons. I'll talk about all of that later when I come back, but first I wanna show you guys this thing up close, how to take the tank apart, how the mod functions, all of that jazz. And I do wanna tell you guys I have some for give away. I'm gonna give some away on YouTube, all three of these, and then later on, stay tuned, 'cause I'm gonna have another giveaway on Instagram and Facebook.
Alrighty guys, so next up let's check this thing out.
Here is how the Revenger kit will come packaged. There's a little sticker, it tells you it's a 5-milliliter tank. On the back, it tells you what's inside along with a little picture, and there's also specifications. I do always like Vaporesso packaging, it's just so pretty. Opens like so. So over here there's the mod, the tank, extra glass and a little spare parts bag, and in this box there's a really fancy pantsy looking USB cable for charging and firmware updates. Inside of this black envelope there's a 90-day warranty card and a warning card that you should definitely read before using the product.
There's a couple of manuals in a bunch of different languages. There's a spare glass tube, extra seals for the tank and even a 510 drip tip adapter. And here is the NRG tank. Holds 5 milliliters of e-liquid, and it is actually on the bigger side, 26.5 millimeters in diameter. This has a top fill design similar to SMOK or SMOK tanks. You just swivel it out like so, and then pour your liquid into here. At the top, you can see there's a fairly wide drip tip and if you look down in there, you can see there's a spit back guard. This drip tip is removable. If you don't wanna use this you can use one of your own drip tips because they do include that 510 adopter.
Here's that adopter again. If you just try to stick it in there, it's gonna be really loose, however in the little spare parts bag they do give you some O-rings for it, so you just have to remember to stick one of these on or it just won't stay in there. And now I can squeeze this into the top.
On the bottom there are two fairly big air flow slits, those are adjustable and on a stopper. To get to the coil or to replace the glass twist off the base, the glass does just pop off like so and then the coil just twists out of the base. There's two coils included, one of them is inside of the tank. Both of them are 0.15 ohms except one can be vaped between 30 and 70 watts and the other one can be vaped between 50 and 110.
And here is the Revenger. So this will come with this protective stuff on here. This right here, is a pretty big OLED screen, plus and minus buttons, there's a mode button, a USB port. On the side is the fire button and at the top is a 510 spring-loaded connection and on the bottom battery ventilation. To get to the batteries. This just pops off like so. The battery door is held on by magnets and this will hold two 18650 batteries, which are not included. There's no rattle or movement to the door, it's securely on here.
To turn the mod on click the fire button five times. I'm not sure if you noticed, but I did switch to a worse camera 'cause with the one I'm using, no matter what I do, the screen just keeps flashing.
If you hold down the mode button and this one at the same time you can lock the mod. Just hold them down again to unlock the mod. So when it says system locked you can still fire it however you can't adjust any of your settings.
If I hold down the plus and minus button together it'll flip the screen. Mode and fire at the same time gives you the serial number.
So on the screen, you can see a battery life indicator for each battery, shows you what mode I'm in, what vape strength, there's resistance, voltage you'll see when I'm vaping, displays wattage, and there's also a timer.
So if I just keep holding this down, it will eventually time out. I think I'm pretty safe at 5 watts after 10 seconds. This will fire as low as 5 watts then it goes up and down in increments of 0.1. Hold the button down, it'll do this a lot faster. All the way to 220 watts. The mod does have different modes. VW that is wattage mode... Oh, I like this. When the screen times out you get this nice clock.
Alright, so let's go back. So let's check out the different modes. Just use the mode button, hold it down for about 3 seconds, or not even. So, there's stainless steel, this is temperature control, obviously, there's nickel, titanium. If you keep going this is TCR settings; memory one, two, bypass, this turns it into a mechanical mod, kind of basically, and system set.
So, right here now you can see a little S, that is for smart wattage recognition. So, in wattage mode if I click the mode button three times, here it says CCW, click the mode button again and once it's on CCW hold the mode button down, and here I can adjust for a custom power curve. So this gives you a nice little ramp up time. Once you have one bar set, click mode, and it'll go to the next one, so you can adjust each and every one of these. Once you're done, hold down the mode button and the power curve will be set.
So once you have this set and you don't wanna use a custom power curve anymore, click the mode button three times, it'll bring you back here, click it again and then hold it down.
In temperature control, if I click the mode button three times, I can do the same thing, however, I have one more option, TCR. So, CCT, this is the custom power curve again and TCR, hold down the mode button, here, you can adjust the TCR setting for stainless steel, and in the manual they do give you a range for each metal. So, M1, M2, if I click mode three times again I can adjust the TCR settings.
Right, so back to system set. Click mode three times. The first one, that is wattage mode, VW is wattage mode, hold down mode, here I can adjust for different vape strength. Now, some of these mods made before July 12th will come on high, so make sure you put it back on normal 'cause otherwise you could fry the coil. So there's soft, normal, and high. I'm just gonna leave it on normal.
Next one down just click the mode button, and then to go into these hold down the mode button. So this is temperature control, here you can adjust wattage. I'm kind of curious, I wonder if this sets this for every single wire. Yep, it is showing 60 watts for every single metal and including memory one and two as well.
Time set. You can put the date in here, and then once you're done with this here you have the option of having it on pointer, you can have that clock that I showed you guys before off, or numbers instead of Roman numerals. A little bit easier to read for some people, but I do like the clock, it's pretty.
Next one down, default. So I guess this brings back the default settings, and I don't want that. Number five smart wattage recognition. You can leave it on or turn it off if you don't want it. Screen time out. So this is how long before the screen will go dark and you can go from 3 seconds all the way to an hour, and default is 15 minutes. So you'll be seeing that clock for 15 minutes before it shuts off. And the last one, that is just exit.
So that is with the smart wattage recognition. It put me at 60 watts. I did have the air flow completely open, so I'm gonna adjust that. I'm gonna chain vape this for you guys and see how well this coil performs. This is the one that can be vaped between 50 and 110 watts, but it says it's best between 60 and 80. So smart wattage recognition was right, it did put it at 60. But let's see where it tastes best.
And now I'm gonna play around with the air flow a little bit. So 65 watts and half-way closed off.
It's performing really nicely, a lot better with the air flow partially closed off, gets rid of that whistle that I had earlier. Now at 70 watts.
I'm not even taking a full hit, that's like a half hit. I'm gonna bump this up to the full 80 watts. So far I think it's tasting best around 65-70, but let's see how it does at 80. So at 80, I'm gonna open up the air flow just a little bit more leaving it about 75% open.
Performing just fine. I'm not getting any dry hits. However, I don't think I've chain vaped it quite long enough for a dry hit yet, 'cause the coil can go up to 110 watts. So let's see how it does at the full 110. I'm gonna open up the air flow completely for this one.
You can vape it at 110 watts, I'm not getting any dry hits at all. It's performing fine but the flavor is muted now at 110.
So you can vape it at 100 watts. However, I do have my vape strength set at normal, I'm not gonna vape 110 watts on high. On high it does like a pulse mode. So let me put it on high just so you can kinda see, or maybe you can even hear it on camera, the difference.
So I don't know if you guys can hear it or not, but it does this pulsing thing. So it feels like the power is kinda going in and out a little bit.
So I had no idea that the vape strength on all of these was set on high for default and Vaporesso has told me that everything made before July 12th will have it set on high. They have corrected the issue. So now, everything released after July 12th will have it set on normal for default. If you do end up getting this, make sure when you turn it on in the screen it says N-O-R for normal and not high, unless you wanna vape it on high.
The pros and cons. Well, first of all, I love the look of the mod, it's really sleek, classy-looking. I like how the edges are rounded off. It feels nice in my hand. I like when the screen goes dark, instead of just being dark there's a little clock and you can change it to digital or you can completely get it off of there if you don't want it. So when I first saw this, I'm like, Okay, it's kind of tinted here and there. When I turn it on the screen is gonna be really dim, but no, it's big and bright, easy to see. Not only is there a fire button, plus, minus there is another option, a mode button, which makes it a little bit easier to get around in the menu and you won't be accidentally firing your coils. So a pro for that. The 510 connection, it's right in the middle, it is centered, that is perfect, especially if you wanna use bigger tanks on here, you can fit them up to 28 millimeters in diameter. With that OMNI Board chipset the mod fires like incredibly fast.
Love that. But not only that. You can also do custom power curves in temperature control, and in wattage mode. So it gives you a nice boost up time, a ramp up time I mean. You can also adjust wattage in temperature control mode. However, the way they have it I don't really like it. So, I'm gonna give it a con for that. It's a little bit hidden, you have to go all the way to system set, go into temperature control, change the wattage in there and then it changes that across the board for every single wire.
For that, I definitely would've liked to see set up a little bit differently. Maybe as you're scrolling through the temperature, you can do it right from there. But the way it is now, you have to go into system set and adjust everything in there. And you can adjust TCR settings as well. And the manual does have a range for each metal. So this does have smart wattage recognition. It'll set the wattage based on the resistance of the coil. So as soon as I take this off, put it back on, gonna ask me if it's a new coil or an old coil. So, I'm gonna click plus. And it's set at 60 watts. And before that, I had it at 73. So now with the smart wattage it sets it at 60. However, if you go to system set you can turn off smart wattage recognition.
Alright, so cons. Of course I'm gonna find something wrong with it. Let's start with the tank. It's pretty much like a regular sub-ohm tank. Flavor is pretty good. I'm gonna put it somewhere in the middle, but what I really don't like about the tank is that drip tip, it's got a spit back guard and with spit back guards it often mutes the flavor and that's kind of what it's doing. However they do give you a 510 drip tip adaptor, don't forget to put on the O-ring on there otherwise it's gonna be really loose, and then you can use one of your own. In fact, I'm gonna switch it out right now.
Oh yeah, I am getting more flavor with the drip tip I'm using now. Oh, with that drip tip that they included I wish they would have had an option to at least remove that spit back guard, but the way it is, it's all one piece and it's not a regular sized drip tip so it's gonna be really hard to find another one that's wide like that that'll fit.
I do like the look of this thing, but boy, is it a fingerprint magnet, and it's a finger print magnet from both sides. Front and back. Just use your pants, and it'll be all nice and shiny again.
So one of the biggest cons that I have with this mod is navigating through it. If you're fairly new to vaping I'm not gonna recommend this because it is a little bit more on the complex side and the manual, it doesn't really explain it all that well, doesn't really explain how to get to system set and all the different functions in there. It's kind of a pain in the butt adjusting wattage and temperature control mode. So I think they could have made that a little bit easier.
And that's mostly it for pros and cons. Oh, one more thing. It is firmware upgradable. So once that's available, you just plug it into your computer and do the update. Now the USB port, if you wanna use it for charging it does have balance charging, so you could use it, however don't leave it on there over night. I'm gonna recommend just getting an external battery charger.
Overall, I'm pretty satisfied with this mod. Like everything else, it's got its pros. It's got some cons. Biggest one being navigating through it. Other than that, I really do like it. The tank doesn't leak at all. And I have been using the absolute crap out of it. I have had this since before July 12th.
So yeah, that is pretty much it guys. If you're interested in picking up one of these, I did find them on Element Vape, Myvaporstore, Vapor DNA. They're between $66 to $78 for the whole kit. However, I do have some for giveaways so with just like all my other ones, leave your comment down below and about a week from now I'm going to pick three random winners. I announce the winners in the video's description and also on my Facebook page. And in the video's description, you can also find the full contest rules. You do have to be an adult, 18 in most states, 21 in a couple of others. This is open to the US only. Sorry guys, but I had too many issues shipping stuff outside of the country. So that has ended.
Being that this is a contest, I can't charge fees, but the FDA requires that I charge a fee, since this is a tobacco product. That's $6 and it just basically covers shipping and that is it. That is it guys! If you want to check me out elsewhere I'm also on Facebook, Twitter, Instagram, and my other channel called Just Zophie. Bye guys.