
Vaporesso has done it again and designed an e cig kit that is so high quality and durable, you won't want to use anything else. The Vaporesso Revenger Mini kit comes with the Vaporesso NPG SE Mini tank, as the duo pair extremely well together. This combo of device and tank function at a high level and produce amazing flavor and vape clouds, so what else could anyone ask for? The Vaporesso Revenger Mini is perfectly crafted for vapers of all experience levels and will get you through those long, tough days at the office or all through an exciting night on the town. Invest in your vaping time and get this extremely reliable device to enhance your world as soon as possible.

Vaporesso Vaporesso Revenger Mini reviews
Video Transcript: Vaporesso Revenger Mini 85W TC Vape Kit Review by Zophie Vapes
Hey there, guys. Today, for a review, I have Vaporesso's Revenger Mini Kit. So, the kit does include the tank that's sitting on top. This is the NRG SE. Tank holds 3.5 milliliters of e-liquid, and I do believe they're going to have a TPD-compliant version for two milliliters. The mod itself has an internal 2,500 milliamp-hour battery, and it goes up to 85 watts. It does temperature control as well, nickel, titanium, stainless steel, has TCR settings, custom power curves, you can even adjust wattage in temperature control mode. And the thing that they added, you could probably barely see it on camera, but they added lights, and here they all are, depending on what color mod you get, it has different light patterns. And on top of all of that, it also has smart recognition. So, it sets the wattage based on the resistance of the coil. And I do have some for giveaways, so two of them I'm going to be giving away here on YouTube, and then this blue one, that you're going to see next, I'm going to give away on my Instagram page a little bit later. So, next up, let's check out this kit up-close.
Here's how the Revenger Mini Kit will come packaged. On the side of the box, it tells you what's included inside. On the back of the box, they have the specifications and the light pattern for this mod. So, for example, this silver and black one, this one has a different pattern. To open this box up, slides out like so, and then it opens up like this. So, on this side, there's a fancy pants-looking USB cable. Inside of this envelope, there's a warranty card and this little warning card that should be read before using the product. And this also came with three sets of manuals, they're all the same thing, just in different languages. On the other side, there's a little card with some tips, definitely recommend reading this. And on the back of that is the recommended wattage for each coil, and it even shows you if you're vaping it in high, normal, or soft mode. Well, this kit does come with two coils, one of them is already inside of the tank. The one that's out of this package, it is a ceramic coil, it's a 0.5 ohm coil that can be vaped between 25 and 35 watts. That's not entirely accurate. It is for normal vape strength, but if you have it high, it's 15 to 25, and on soft mode, it's 30 to 40 watts.
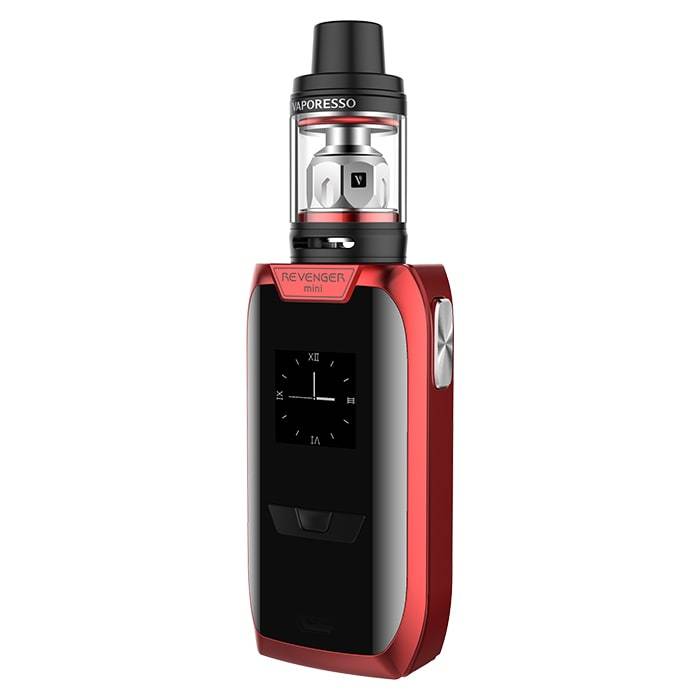
For the tank, there is an extra glass piece with additional seals. So, here is the NRG SE tank, this holds 3.5 milliliters of e-liquid. On the bottom, there are two airflow slits which are adjustable and on a stopper. At the top is a Delrin drip tip, this is removable. And the tank is 510 compatible. The tank is top filling, and it's kind of on a swivel design. So, you see where this little arrow is? Push it right there, it swivels out, and then you pour your e-liquid into that hole. To take this apart, to get to the coil or to replace the glass, twist the base. The glass does pop off, but it's pretty tight when this thing is brand new, and then the coil just twists out like so. Here's the other coil, this is a 0.15 ohm coil that can be vaped between 30 and 70 watts. So, this is the GT4, and again, it does depend on what vape strength you're vaping at. And here's the mod, the Revenger Mini. It has a 2500 milliamp-hour lithium battery. And the screen does look kind of terrible because it's got the screen protector when this is new, so do peel that off. And the protector is on both sides.
At the very top is a centered 510 spring-loaded connection, on the side is the fire button. This is the OLED screen, it's pretty big. Plus and minus buttons, the center one is the mode button and on the bottom is a USB port. And on the very bottom of this thing, you can see a bunch of battery ventilation. So, to turn the mod on, click the fire button five times. So, on the big screen, you can see a battery life indicator. VW, that means it's in wattage mode. 9.99 resistance, there's nothing on here, that's why it's displaying that. It will be more accurate once you stick an atomizer on here. Voltage, you can see when you're vaping. I am currently in normal vape strength. And once that screen times out, you do get this clock, which you can change or turn off completely. Let's go back to this screen. So, I'm in wattage mode. It will fire as low as five watts. I am in wattage mode currently. And then using the plus and minus buttons, I can go up and down in increments of 0.1. If I hold this down, it'll do this a lot faster in increments of one watt, it'll go all the way to 85 watts. So, if I click the center button and the fire button at the same time, it'll tell me this is the Revenger Mini, which version, serial number, and the chip set. Plus button and fire button at the same time just brings me to the timeout screen.
That center one, this is the mode button, if you click it three times, it'll bring you to the menu. One, two, three, so here's the mode menu. If I go up, number one, VW high, that's wattage mode, high vape strength. So, this is what mode high, normal, soft means on this little card. So, again, number one is wattage mode, high vape strength, number two is normal, and number three is soft. So, number four, this is a custom power curve, and this one was already set up like this, however, you can change each one of these little notches just using the plus and minus buttons, you see how the wattage is adjusting. So you can have it wherever you want. Once you're happy with where it is, click the fire button, and then you can adjust the next row. And you can do this for each and every single one of these. Once you're happy with where it is, click the mode button, and now you have a custom power curve.
This mod also does temperature controls. Number five, this is stainless steel, and for this you have a bunch of different options. So the very first one is TCR, Temperature Coefficient of Resistance. You can tweak that if you wish, using the plus and minus buttons. Once you're okay with your setting, just click mode and that would set for temperature control. So in temperature control, you can go up and down in increments of 10 degrees, all the way to 600 degrees Fahrenheit, and then it switches over to Celsius. So in Celsius, it goes up and down in increments of five degrees, all the way to, I think it's 315, and then it switches to Fahrenheit. But going back into number five, the next one down, number two, you can adjust your wattage in Temperature Control Mode. So again, use the plus and minus buttons. This gives you a little pre-heat. Once you like where it's at, click mode, and there you go. And now you can see the wattage displayed right here. After Power Set, the third one in here, this again is a custom power curve. So it would do the same thing except in temperature mode. Let's go back in here one more time in the very last one, Lock or Unlock, this is for resistance, you can lock it in or not. Number six is the same as number five, except it's for nickel wire, and number seven is for titanium.
So again, you can do all the same stuff I just showed you. And number eight and nine, these are both memory settings. In here, you can set the TCR, adjust wattage and temperature control mode, and lock/unlock, the resistance. Number 10, this is really only for advanced users; this turns this into an unregulated mode. If I keep going, it brings me to System Set, click Mode, very first one, I can set the time. Here, I can set the date using plus and minus buttons, adjust the time, and the clock, you can either have it Pointer, which is what it was on, Numbers, or completely off. So once you have everything set the way you want it, hold down the Mode button until it goes to Okay, and it brings you back to System Set. Next one down is the Screen Brightness, so you can adjust that. It does already come at 100%, but if you want it dimmer, you can do that. Third one down, this is the Puff Counter, it shows you the amount of puffs, and you can reset that. Number four, this is the smart wattage recognition. So you can either have it on, if you don't want it, you can turn it off. Screen timeout time, number five, you can have it for 15 minutes, it does go all the way down to just seconds, three seconds at the very least. And at the very most, this is in minutes, I think it's a full hour.
Yep, 60 minutes. Once you have it where you want it, hit Mode. Next one down, these are the lights. So in Light Set, number one, you can have the lights on or off; number two is a red light; number three is red breathing, so the lights will kind of go in and out, and see, this one is flashing lights. So let's see what flashing lights look like. Okay, so it goes through all the different colors and it does the same breathing effect you saw earlier; and number nine is custom. So if you go into here, you can change the different colors to whatever you want; there's actually more options. You can select the kind of mode. So there's always on, breathing, and a flash effect. And number three, Start Up, so you can have the lights always doing this, or number two, you can have them doing this only when you're firing the mod. So going back into System Set, after the lights, there's a diversion again, which I showed you guys the shortcut too. Number eight will restore all of this to factory settings.
So here's my mod. If I go into the lights, I'm just going to scroll through all the different colors that they have already pre-programmed in there. That's that breathing red. And here it cycles through all the different ones. So there you have it, folks. And one thing I forgot to show you guys in the up-close part, one, two, three, the little lock symbol appears, that does sort of lock the device. Basically, you can't change any of your settings, so whatever your wattage is set, you don't have to worry about it changing or temperature. But you can still fire the mod. Not really sure why it's designed that way. I think I would have preferred it to lock everything because otherwise I stick it into my pocket or my purse, I do actually have to shut down the mod because the lock will only lock-in your settings, not the fire button. And now that I'm kind of complaining about it, it is a fingerprint magnet, kind of like your cell phone. So it's going to get a little bit gunked up. I'm constantly wiping it all over myself.
But I really do like this mod, mostly because of its look, it's so pretty and sleek and classy-looking, and I love the way it feels in my hand. It also feels like a quality mod. It doesn't feel chintzy. However, one thing I noticed, and I don't know if you can really see it on camera, there is kind of a gap. You can see it sort of right there. As I already have the blue one open, I might as well check the blue one. This is just being really picky, but you can see a little gap right there maybe. Maybe you can see it. I can see it, but I don't know if you can see it on camera. Woah! Whoever gets this blue one is going to have my fingerprints. For such a fairly small mod, it does come jam-packed with a bunch of different functions. There's wattage mode, temperature control, nickel, titanium, stainless steel, and in both wattage and temperature control, you can create custom power curves, and you're going to adjust your wattage in temperature control mode as well.
There's also TCR settings, Temperature Coefficient of Resistance, and there's two memory settings as well. And for the more experienced user, you can also put this into bypass mode, which basically turns it into an unregulated device with safety features, so pro for that. And on top of all of that, you can also lock your resistance. The menu system, on the mini version, I think, is a lot easier to grasp than the original Revenger; that one was a little bit more complicated. So I'm glad that they simplified it and made it more user-friendly. Whether you're a fan of the lights or not, doesn't really matter, if you like the mod, because there is an option to turn them off, you don't have to have them on. I definitely don't recommend having them on all the time. It is going to drain your battery. The way I have it set up, they only light up when I fire.
And I'm glad that they let you customize the lights, you can pick different colors. Kind of bummed that you can't pick different patterns, the pattern does depend on what color mod you get. Because this is tinted, I think the screen is a little bit too dim in my opinion, and it does already come on the brightest setting. So right now I do have it set on smart wattage recognition, and I have that ceramic coil in here. It says it's a 0.5 ohm coil that can be vaped between 25 and 35 watts. So let's see where the mod puts the wattage on. So I click new coil, and it puts it at 40 watts.
And the resistance is showing 0.44. So bring back this little card that I showed you guys in the up close video, you can see that the wattage range for this coil is 25 to 30 watts for normal vape strength. In soft mode, you can go up to 40, but it's not recommended for normal. Pre-installed coil is actually the 0.15 ohm coil that can be vaped between 30 and 70 watts. So let's see where it puts this. So it looks like it put it at 40 watts, again, I have normal vape strength, and resistance is showing 0.16 ohms. Open out my handy dandy little card. For this coil, normal vape strength, it's best between 45 and 60 watts. However, you don't have to go by it, you can change your settings, and you can completely turn it off as well.
So right now I do have that ceramic coil in here, and I am enjoying it indeed. It's pretty flavorful. The tank, I haven't had any leaking issues at all. Airflow control is easy to adjust even once it's on a mod, so pro for that. One thing I'm not a huge fan of, this is 510 compatible, however, I would've prefer this flat without the little thing sticking out because if you use all their drip tips, you are going to see that part. It comes with two coils, pro for that. And it's got this nice easy push-fill design, so you just slide this over or swivel, whatever you want to call it, and squeeze your liquid into the hole.
Alrighty, guys, so that's pretty much it. If you're interested in picking up one of these, they're around 60 bucks. Element Vape has them, VaporDNA, My Vapor Stores, not mine, but they have them as well. And I have a couple for giveaways. So two lucky people are going to win one of these. Well, actually, three, but the third one's going to be on my Instagram page. So you do have to be 21 years or older to enter, and have a shipping address somewhere within the United States.
Also, if you are one of the winners, there is a $6 FDA fee. So to enter, all you got to do is leave a comment down below in the comment section, and somewhere in your comment put the word Mini M-I-N-I, mini, 'cause if you don't, you will be disqualified. So put that word, and then also leave a comment on top of that. And that is it. Winners are going to be announced in the video's description, where you can also find the full contest rules and on my Facebook page. And that is it. So that is it.